MODULE 2: DATA STRUCTURES
This module contains resources for learning about data structures in the C programming language.
While other languages have different data structures in terms of their implementation, the concepts stay mostly the same.
Many of the same concepts apply to other programming languages.
The module contains multiple sections beginning with arrays before moving onto a discussion of linked lists then stacks and queues.
It is best to start with Section 1. Before section 1 is an embedded instance of OnlineGDB, an editing environment that allows you to write and compile C code online.
C CODING Environment
Section 1: Arrays
One of the most simple data structures that we have for representing and storing information is that of an array.
Arrays can be visualised like a shelf.
On this shelf is a row of objects (could be books, pots, figurines, trophies, dishes, whatever else one puts on a shelf).
We can access any of these objects just by knowing where on the shelf they are.
We can take away one of these objects or we can replace an object with another one.
We can also just look at it.
In code, arrays are very similar.
They are a single contiguous section of space where we can store information of a type we have specified.
An integer array for example can store a number of integers.
Lets consider the following code wherein we define an array:
            int nums[] = {20,14,35,45,22,66};
            printf("%d",nums[1]);

            >prints out 14
Considering this code we can notice several things.
In this case we have created an array that contains 6 numbers.
The first element of the array, 20, is stored at an index.
This first index is 0.
Thus, we say that arrays in C (and many other languages) are zero indexed in that the indexes of their elements starts at 0.
We see that when creating this array we first start by specifying the type of the array we are aiming to create.
This type denotes what the datatype of the elements contained inside of the array will be.
We then name the array and put [] to denote to C that what we are creating is an array.
Finally we set it equal to an expression that denotes the elements inside of the array.
In this case, we have defined the array without explicitly specifying a size.
However, because we have made the array containing 6 elements that is the number of elements or indexes the array has.
If we want to add more elements to the array then we would have to allocate a new array and move over the existing elements.
In the example above, we have created the array with our elements all in one line.
However, sometimes we want to allocate an array and not populate it immediately.
We can do this in one of two ways:
            int nums[]={0,0,0,0,0,0};
            nums[0]=45;
            int nums2[6];
            nums2[0]=45;
Here we see that we can allocate the array in one of two ways.
The first way is the same as what we had done already.
Once we have added elements to our array we can always change them out for other elements after the fact.
The second array we create, however, is a little different.
For this one we specify a size of the array within the square brackets.
In this case we have said 6, which means our array will have 6 slots for integers.
We could set this to whatever size we want for this.
However, we need to decide this ahead of time in C once more.
In other languages we do not have this limitation necessarily.
Thus far we have created our arrays on the stack.
For more information regarding the difference between the stack and the heap, see module 1 of this repository.
We also have the ability to make our arrays on the heap.
This allows us to allocate much larger arrays that can contain larger amounts of information.
To do so we need to do the same thing as we have done thus far but we need to make a pointer to access this data.
For more information about pointers see module 1 of this repository.
Consider the following code:
            int main(){
              int i;
              int* p = (int*) malloc(200*sizeof(int));
              if (p == NULL) {
                printf("memory failed to allocate. \n");
              }
              else{
                for(i = 0; i < 200; i++){
                  p[i]=i+1;
                }
              }
              //print the elements
              for(i=0; i< 200; i++){
                printf("%d, ",p[i]);
              }

              //dynamically deallocate memory
              free(p);
              p=NULL;
              return 0;
            }
What we have done here is quite a bit more advanced.
In this case, we have inside of our function main allocated an integer array.
In this case we are using malloc to allocate a range of memory with room for 200 integers.
We then check to see if the memory has been allocated by checking to see if the pointer is equal to NULL or note.
If the memory has been allocated properly we can then populate this array.
Once more we refer to memory in the array in much the same way as we have previously.
We can refer to a specific index of our array using our pointer and the square brackets with our index specified in the brackets.
Useful Videos:
int nums[] = {20,14,35,45,22,66};
printf("%d",nums[1]);
>prints out 14
int nums[]={0,0,0,0,0,0};
nums[0]=45;
int nums2[6];
nums2[0]=45;
int main(){
int i;
int* p = (int*) malloc(200*sizeof(int));
if (p == NULL) {
printf("memory failed to allocate. \n");
}
else{
for(i = 0; i < 200; i++){
p[i]=i+1;
}
}
//print the elements
for(i=0; i< 200; i++){
printf("%d, ",p[i]);
}
//dynamically deallocate memory
free(p);
p=NULL;
return 0;
}
Section 2: Linked Lists
In this section we will discuss a second data structure commonly used in programming.
This data structure, known as a linked list, consists of nodes that are chained together.
Think of a linked list as being similar to a row of posts in the ground with ropes tied between the posts.
Each of the posts are connected to at most two other posts, the one behind and the one in front of them in the line.
A linked list data structure is very similar.
It consists of nodes that are attached to their neighbour nodes.
There are typically two types of linked lists.
Singly linked lists are the simpler of the two types of linked lists.
In a singly linked list, each node knows about the next node in the list.
In a singly linked list, however, nodes do not have any knowledge of the node linked BEFORE the current node.
This means that if you're working with a singly linked list and you need to have knowledge of what node came before this is something you will not have.
In a doubly linked list, each node has knowledge of it's previous node and it's next node.
Consider the following image illustrating singly vs doubly linked lists:

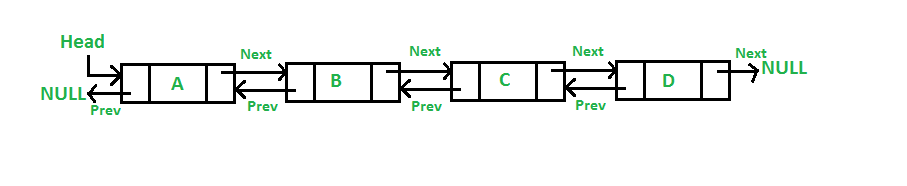
In the top image, we see a singly linked list.
In this case, each node has a link (arrow) to the next node in the "chain".
We can see that once a node has been "visited" and we move onto the next node in the "chain" we cannot go back to the previous node.
This is a limitation of singly linked lists that doubly linked lists solve.
Doubly linked lists do use a bit more memory.
They need to maintain knowledge about the previous node as well as the next node.
This way, we can traverse a doubly linked list in either direction either forwards or backwards.
Both singly and doubly linked lists have their own benefits.
Singly linked lists are more efficient in terms of the resources required to implement them.
Singly linked lists only need to maintain half as many links between nodes, meaning that they take up less memory.
Doubly linked lists, however, allow for far easier access to each of the nodes, and typically doubly linked lists are the better of the two to implement unless you have very limited resources.
Now, let us consider how to implement linked lists in C.
Other programming languages will implement them in similar, though generally simpler ways.
The first step we will need is to define a struct in C for our nodes.
This allows us to easily create and add new nodes to our linked list.
            //define our struct for our nodes
            typedef struct node {
              int value;
              struct node*next;
            }node_t;

            //create our first node.
            node_t * head = NULL;
            head = (node_t *) malloc(sizeof(node_t));
            if (head == NULL) {
              return 1;
            }

            head->value = 42;
            head->next = NULL;
In this code we have first made a struct that allows us to create as many nodes as we need.
The struct defines a value property for each node as well as has a recursive step that lets us define the node as having a next property.
This lets us link the node to the next node in the linked list.
Once we have defined this struct, we can start work on defining our first node.
This node is typically called the head and represents the front of our linked list.
When traversing a linked list, we start at this head typically and move to the next node all the way down to the tail of the list.
In this case, we are defining simply a singly linked list.
Thus, we define the node as having a next value, which for the first node added we set to NULL since we dont have any more nodes.
We also give our node a value using the value property we defined in the struct.
Now lets say we want to add another node. We can do so very simply by changing the ->next property:
            //create the list as before and specify the head.
            node_t * head = NULL;
            head = (node_t *) malloc(sizeof(node_t));
            if (head==NULL) {
              return 1;
            }

            //specify the head's value
            head->value = 42;
            //add a new node onto the linked list.
            head->next = (node_t *) malloc(sizeof(node_t));
            head->next->value = 43;
            //make sure to set the value after this new node to NULL
            head->next->next = NULL;
Here we have defined our nodes in much the same way as we had previously.
We make our initial list then add our first node to the list.
Then we change the next property of our initial node to be equal to a new node and we allocate the memory for it in much the same way as we did for the previous one.
Then we can set the value of the next node as well as set the next node after it to NULL.
We can do this as many times as we would like, adding as many nodes as we see fit.
Now, lets consider how to traverse a linked list such as the one we have made so far.
Before we look at this, its important to note which type of list it is that we have made thus far.
This is a singly linked list not a doubly linked list.
For it to be a doubly linked list, we would need to modify the code to have a previous as well as a next value for each of the nodes.
For the first node in the linked list, the previous value would be set to NULL.
For the purposes of this example, we will continue to consider a singly linked list.
            void print_linked_list(node_t * head) {
              node_t * position = head;

              while (position != NULL) {
                  printf("%d\n", position->val);
                  position = position->next;
              }
            }
In this code, we have defined a function called print_linked_list.
This function takes in a pointer to the head of a linked list.
The first step of traversing this linked list is creating a new pointer that we'll refer to as our iterator.
This iterator allows us to access each of the elements of the linked list one at a time in order from the head to the tail.
It is important that we do create this pointer instead of using our head and shifting it.
Were we to reassign the value of our head pointer this would mean we have lost access to the head of our list.
Inside of our while loop, we first print then reassign our iterator pointer.
This allows us to move along the linked list from the first value in the list to the last value in order using ->next.
Useful Links: Here are some useful links to resources explaining more about linked lists that were used in the development of this repository.
Learn-C.org linked lists
Singly vs. Doubly Linked Lists
Useful Videos:
//define our struct for our nodes
typedef struct node {
int value;
struct node*next;
}node_t;
//create our first node.
node_t * head = NULL;
head = (node_t *) malloc(sizeof(node_t));
if (head == NULL) {
return 1;
}
head->value = 42;
head->next = NULL;
//create the list as before and specify the head.
node_t * head = NULL;
head = (node_t *) malloc(sizeof(node_t));
if (head==NULL) {
return 1;
}
//specify the head's value
head->value = 42;
//add a new node onto the linked list.
head->next = (node_t *) malloc(sizeof(node_t));
head->next->value = 43;
//make sure to set the value after this new node to NULL
head->next->next = NULL;
void print_linked_list(node_t * head) {
node_t * position = head;
while (position != NULL) {
printf("%d\n", position->val);
position = position->next;
}
}
Section 3: Stacks and Queues
Two of the basic data structures you will encounter are stacks and queues.
First, we will consider stacks.
To consider stacks, lets first think of a real world example.
Consider the image below:

Stacks in computer science are very similar to a stack of books in terms of their properties.
With a stack of books, when you add a new book you add it to the top of the pile typically.
Adding a book in the middle or bottom of a pile is tricky.
You often have to shift off the existing books down to where you want to add the book.
In computer science stacks are a data structure with similar properties.
Elements on a stack are added to the "top" or the end of the stack.
We can only access the last-added element.
If we want to access an element in the middle of our stack, we need to "pop" off all of the elements above it.
Because of this, stacks have the property of "last-in first-out".
This means that the last element added to a stack is the only element we can access at any given time.
Lets consider how to implement a stack in code. We'll consider this in C.
Consider what it is that we need to implement a stack.
First, we need a means of adding an element to the stack.
This is typically referred to as a push operation.
Then we need to be able to remove an element from our stack.
This is typically called a pop operation.
Thirdly, we want to be able to see the most recently added element without removing this element.
This is typically referred to as peak.
Consider the following code:
            #include stdio.h
            #include stdlib.h

              int top = -1, inp_array[SIZE];
              void push();
              void pop();
              void peek();

              int main(){
                  int choice;

                  while (1==1){
                      printf("Interact with your stack:\n");
                      printf("1.Push the element\n2.Pop the element\n3.Peek\n4.End\n\n");
                      printf("Enter the choice: ");
                      scanf("%d", &choice);

                      switch (choice){
                      case 1:
                          push();
                          break;
                      case 2:
                          pop();
                          break;
                      case 3:
                          peek();
                          break;
                      case 4:
                          exit(0);

                      default:
                          printf("\nInvalid choice!!");
                      }
                  }
              }

              void push(){
                  int x;

                  if (top == SIZE - 1){
                      printf("\nOverflow!!");
                  }
                  else{
                      printf("\nEnter the element to be added onto the stack: ");
                      scanf("%d", &x);
                      top = top + 1;
                      inp_array[top] = x;
                  }
              }

              void pop(){
                  if (top == -1){
                      printf("\nUnderflow!!");
                  }
                  else{
                      printf("\nPopped element: %d", inp_array[top]);
                      top = top - 1;
                  }
              }

              void peek(){
                  if (top == -1){
                      printf("\nUnderflow!!");
                  }
                  else{
                      printf("\nElements present in the stack: \n");
                      for (int i = top; i >= 0; --i)
                          printf("%d\n", inp_array[i]);
                  }
              }
In this code we are doing several things.
First we define our array in memory which we'll use to hold our stack.
We also define our main function.
Here it simply allows us to interface with our stack via our terminal rather than just in code.
Finally we have defined three functions.
void push() checks to see if we have room in the memory we allocated for our stack to add an element then adds the element.
void pop() checks to see if there is an existing element on the stack then removes the "top" one if there are one or more elements.
void peek() checks to see if there is an existing element on the stack then look at the "top" one if there are one or more elements.
Queues exist as a similar data structure to stacks but they are in reverse.
While Stacks operate as a Last In First Out system where you can only access the last element added, queues give you access to old only the oldest element (the one added the longest ago).
We can think of a queue like we can think of a line of people waiting at a bank.
People join the line (queue) but will not be called up until they have been waiting in the line the longest of anyone left.
Queues are very similar.
Elements are added to the back and accessed from the front of the queue.
Lets consider how to make a queue.
Queue's will have most of the same properties of a stack.
However, we need to remove the oldest elements instead of the newest.
Thus, the queue will be Fist In First Out (FIFO).
We still need a data store.
We also need a means of pushing elements, popping elements, and peeking to see what the next element is.
Let us consider the following code:
            #include stdio.h
              # define SIZE 100
              void enqueue();
              void dequeue();
              void show();
              int inp_arr[SIZE];
              int Rear = - 1;
              int Front = - 1;
              main()
              {
                  int ch;
                  while (1)
                  {
                      printf("1.Enqueue Operation\n");
                      printf("2.Dequeue Operation\n");
                      printf("3.Display the Queue\n");
                      printf("4.Exit\n");
                      printf("Enter your choice of operations : ");
                      scanf("%d", &ch);
                      switch (ch)
                      {
                          case 1:
                          enqueue();
                          break;
                          case 2:
                          dequeue();
                          break;
                          case 3:
                          show();
                          break;
                          case 4:
                          exit(0);
                          default:
                          printf("Incorrect choice \n");
                      }
                  }
              }

              void enqueue()
              {
                  int insert_item;
                  if (Rear == SIZE - 1)
                     printf("Overflow \n");
                  else
                  {
                      if (Front == - 1)

                      Front = 0;
                      printf("Element to be inserted in the Queue\n : ");
                      scanf("%d", &insert_item);
                      Rear = Rear + 1;
                      inp_arr[Rear] = insert_item;
                  }
              }

              void dequeue()
              {
                  if (Front == - 1 || Front > Rear)
                  {
                      printf("Underflow \n");
                      return ;
                  }
                  else
                  {
                      printf("Element deleted from the Queue: %d\n", inp_arr[Front]);
                      Front = Front + 1;
                  }
              }

              void show()
              {

                  if (Front == - 1)
                      printf("Empty Queue \n");
                  else
                  {
                      printf("Queue: \n");
                      for (int i = Front; i <= Rear; i++)
                          printf("%d ", inp_arr[i]);
                      printf("\n");
                  }
              }
In this example, we have defined a queue in C much the same as we have defined a stack in C previously.
However, this time we have done a couple of things differently.
Notice that we create our array of memory in C in much the same way.
However, we need access to the back of the queue and the front this time.
This is because we need to be able to push or enqueue to the back of the queue and we need to pop or dequeue from the front of the queue.
This means that we need two pointers, one to the front of the array of memory and one to the back.
Next we need to have the same functions as we had before but they need to behave a little differently.
enqueue() can be thought of as being the same as push().
enqueue() takes a new element being passed to this code from the terminal and adds it to the back of the queue.
dequeue() takes the oldest element (the one at the front of the queue) and removes or pops it off the queue.
show() behaves similarly to how peek would behave with a stack.
show() lets us see the next element that we would pop without having to remove it first.
Thats stacks and queues!
Consider looking at the youtube links and other resources posted below.
Also try implementing this stack and queue yourself in C or whatever language you would like using the programming environment above.
Youtube Links:
#include stdio.h
#include stdlib.h
int top = -1, inp_array[SIZE];
void push();
void pop();
void peek();
int main(){
int choice;
while (1==1){
printf("Interact with your stack:\n");
printf("1.Push the element\n2.Pop the element\n3.Peek\n4.End\n\n");
printf("Enter the choice: ");
scanf("%d", &choice);
switch (choice){
case 1:
push();
break;
case 2:
pop();
break;
case 3:
peek();
break;
case 4:
exit(0);
default:
printf("\nInvalid choice!!");
}
}
}
void push(){
int x;
if (top == SIZE - 1){
printf("\nOverflow!!");
}
else{
printf("\nEnter the element to be added onto the stack: ");
scanf("%d", &x);
top = top + 1;
inp_array[top] = x;
}
}
void pop(){
if (top == -1){
printf("\nUnderflow!!");
}
else{
printf("\nPopped element: %d", inp_array[top]);
top = top - 1;
}
}
void peek(){
if (top == -1){
printf("\nUnderflow!!");
}
else{
printf("\nElements present in the stack: \n");
for (int i = top; i >= 0; --i)
printf("%d\n", inp_array[i]);
}
}
#include stdio.h
# define SIZE 100
void enqueue();
void dequeue();
void show();
int inp_arr[SIZE];
int Rear = - 1;
int Front = - 1;
main()
{
int ch;
while (1)
{
printf("1.Enqueue Operation\n");
printf("2.Dequeue Operation\n");
printf("3.Display the Queue\n");
printf("4.Exit\n");
printf("Enter your choice of operations : ");
scanf("%d", &ch);
switch (ch)
{
case 1:
enqueue();
break;
case 2:
dequeue();
break;
case 3:
show();
break;
case 4:
exit(0);
default:
printf("Incorrect choice \n");
}
}
}
void enqueue()
{
int insert_item;
if (Rear == SIZE - 1)
printf("Overflow \n");
else
{
if (Front == - 1)
Front = 0;
printf("Element to be inserted in the Queue\n : ");
scanf("%d", &insert_item);
Rear = Rear + 1;
inp_arr[Rear] = insert_item;
}
}
void dequeue()
{
if (Front == - 1 || Front > Rear)
{
printf("Underflow \n");
return ;
}
else
{
printf("Element deleted from the Queue: %d\n", inp_arr[Front]);
Front = Front + 1;
}
}
void show()
{
if (Front == - 1)
printf("Empty Queue \n");
else
{
printf("Queue: \n");
for (int i = Front; i <= Rear; i++)
printf("%d ", inp_arr[i]);
printf("\n");
}
}
Section 4: Doubly-Ended Queues (Deques)
In the previous section, we considered stacks and queues, which can be seen as the opposite of eachother.
With a stack, we add elements and take them off the "top" much like we do a stack of books or magazines.
With a queue, we add elements to the back and pop them off the front, much like a line at a bank teller.
There exists a variation on stacks and queues that combines the two previous data structures.
This combined data structure is known as a deque or doubly-ended queue.
Unlike a stack or queue we can add elements and remove elements from either the front or the back of the deque at will.
We, thus, maintain knowledge of both ends of our deque, hence doubly-ended queue.
We can think of a deque as being similar to a tube that contains a bunch of marbles.
Both ends of the tube are open.
From each end we can add another marble to the tube, or pull out the marble that is closest to the end of the tube.
We can do this from either end of the tube, but we do not have the ability to access one of the marbles in the middle of the tube.
To do this, we would still need to remove marbles and place them elsewhere until we reach the marble we're looking for.
To see this more clearly, consider the following diagram:

Now, lets consider how we can implement a dequeue in C.
Consider the following code block:
            #include
            #include

            int maximum =10;  // Define maximum size of the deque

              int deque[maximum]; //implement using an array
              int front = -1;
              int back = -1;

              // Check if the deque is full
              int full() {
                  return ((front == 0 && back == maximum - 1) || (front == back + 1));
              }

              // See if the deque is empty
              int empty() {
                  return (front == -1);
              }

              // Insert element at front of deque
              void addFront(int key) {
                  if (isFull()) { //check to see if we have room left in the deque
                      printf("Deque is full.\n");
                      return;
                  }

                  if (front == -1) {  // If deque is initially empty
                      front = 0;
                      back = 0;
                  } else if (front == 0) {
                      front = maximum - 1;  // wrap around
                  } else {
                      front = front - 1;
                  }

                  deque[front] = key;
                  printf("Inserted %d at the front.\n", key);
              }

              // Insert element at back of deque
              void insertBack(int key) {
                  if (isFull()) {
                      printf("Deque is full.\n");
                      return;
                  }

                  if (back == -1) {  // If deque is initially empty
                      front = 0;
                      back = 0;
                  } else if (back == maximum - 1) {
                      back = 0;  // wrap around
                  } else {
                      back = back + 1;
                  }

                  deque[back] = key;
                  printf("Inserted %d at the back.\n", key);
              }

              // Delete an element from the front of the deque
              void deleteFront() {
                  if (isEmpty()) {
                      printf("Error, deque is empty.\n");
                      return;
                  }

                  int removed = deque[front];

                  if (front == back) {  // Deque has only one element
                      front = -1;
                      back = -1;
                  } else if (front == maximum - 1) {
                      front = 0;  // wrap around
                  } else {
                      front = front + 1;
                  }

                  printf("Deleted %d from the front.\n", removed);
              }

              // Delete an element from the back of the deque
              void deleteBack() {
                  if (isEmpty()) {
                      printf("Deque is empty.\n");
                      return;
                  }

                  int removed = deque[back];

                  if (front == back) {  // Deque has only one element
                      front = -1;
                      back = -1;
                  } else if (back == 0) {
                      back = maximum - 1;  // wrap around
                  } else {
                      back = back - 1;
                  }

                  printf("Deleted %d from the rear.\n", removed);
              }
In this code block, we have done a number of things.
First, we create our array in memory with a maximum size.
This allows us to check and see if we have run out of space.
We also create variables that are our front and back indices for the array.
We could do this on the heap using pointers as well if we need to allocate a larger deque or a deque for a non primitive type.
We then declare multiple functions for adding elements as well as removing elements from the front and the back of the deque.
We could also define functions that would be used for implementing peeking at the front or the back of the deque as well if we want to see the element without removing it.
Useful Links:
Guide on Doubly Linked Lists in C
Youtube Videos:
In Python:
#include
#include
int maximum =10; // Define maximum size of the deque
int deque[maximum]; //implement using an array
int front = -1;
int back = -1;
// Check if the deque is full
int full() {
return ((front == 0 && back == maximum - 1) || (front == back + 1));
}
// See if the deque is empty
int empty() {
return (front == -1);
}
// Insert element at front of deque
void addFront(int key) {
if (isFull()) { //check to see if we have room left in the deque
printf("Deque is full.\n");
return;
}
if (front == -1) { // If deque is initially empty
front = 0;
back = 0;
} else if (front == 0) {
front = maximum - 1; // wrap around
} else {
front = front - 1;
}
deque[front] = key;
printf("Inserted %d at the front.\n", key);
}
// Insert element at back of deque
void insertBack(int key) {
if (isFull()) {
printf("Deque is full.\n");
return;
}
if (back == -1) { // If deque is initially empty
front = 0;
back = 0;
} else if (back == maximum - 1) {
back = 0; // wrap around
} else {
back = back + 1;
}
deque[back] = key;
printf("Inserted %d at the back.\n", key);
}
// Delete an element from the front of the deque
void deleteFront() {
if (isEmpty()) {
printf("Error, deque is empty.\n");
return;
}
int removed = deque[front];
if (front == back) { // Deque has only one element
front = -1;
back = -1;
} else if (front == maximum - 1) {
front = 0; // wrap around
} else {
front = front + 1;
}
printf("Deleted %d from the front.\n", removed);
}
// Delete an element from the back of the deque
void deleteBack() {
if (isEmpty()) {
printf("Deque is empty.\n");
return;
}
int removed = deque[back];
if (front == back) { // Deque has only one element
front = -1;
back = -1;
} else if (back == 0) {
back = maximum - 1; // wrap around
} else {
back = back - 1;
}
printf("Deleted %d from the rear.\n", removed);
}
Section 5: Trees
Thus far we have looked at some basic data structures that let us represent and store information in our programs.
Now we are going to look at a more advanced data structure that is incredibly common.
This section discusses the tree data structure in general.
Links below will lead you to many of the different variations on trees that exist, as trees represent a family of a multitude of different data structures.
This section will theoretically introduce trees and how they work.
For specific tree implementations, see the links provided.
Trees are a type of data structure that are, as the name suggests, modelled after trees in nature.
Trees in nature have a base that branches into a series of branches that extend up from this base.
At the end of the branches we find leaves.
Trees in computer science are very similar.
Consider the following image of a tree data structure:
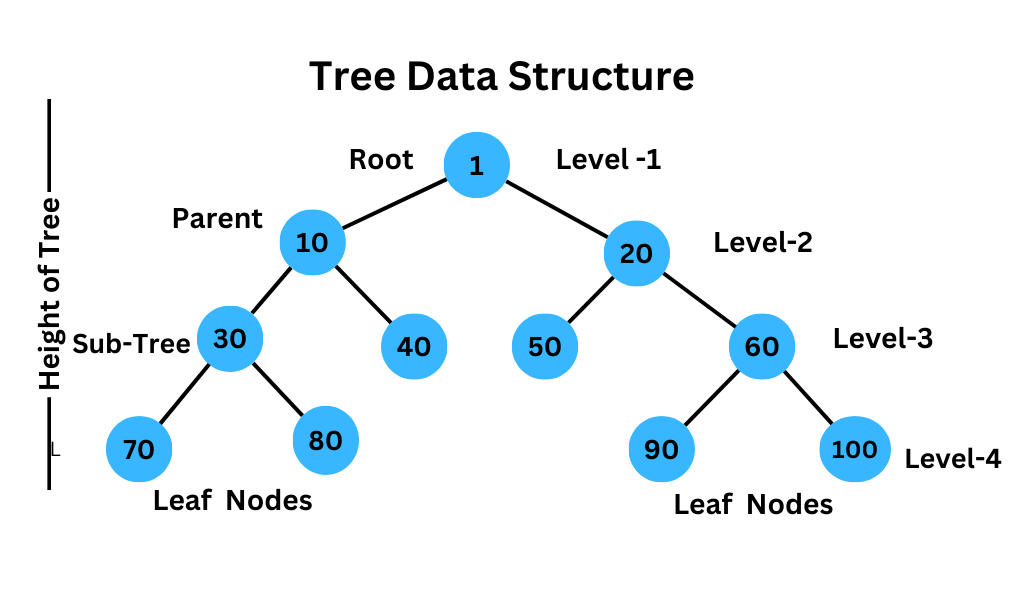
In this image we see a basic tree data structure.
At the top of the image, we see a singular node.
This node is referred to as the root node.
Just like in a linked list, trees are comprised of these nodes that are connected together via references to the other nodes.
Below this root, we see that there are two nodes connected to the root node.
These nodes are referred to as the root's children.
These children also have children all the way down to the bottom nodes.
These bottom nodes that do not have children are typically referred to as leaves.
Each node that do not have child nodes attached to them are leaves regardless of their location on the tree.
In this example image, we see that each node is attached to at most 1 parent node and 2 children nodes.
This is what's known as a binary tree.
It is called a binary tree because it has at most bi (2) child nodes attached to each parent node.
Not all trees are binary; some may have three child nodes per parent node, some may not have a specific maximum number of nodes.
How many child nodes and the structure of the tree depends on how you choose to define it.
In essence we can see that this is similar to a linked list, but it has a range more connections.
Rather than having a previous and next value like a doubly linked list, a node on a tree has a potential parent node and potential child nodes.
With a tree, we say that the tree begins with the root (at the top of the image above).
Hanging off this root node, are connections to all of the other nodes on the tree.
Each node has a subtree of nodes connected to it below it (its children and their children).
This is referred to as a subtree of our overall tree.
Each node in the tree tracks it's parent node as a connection as well as it's children.
The root node has no parent, so it's parent connection would be set to NULL.
Leaf nodes do not have any child nodes as they are the bottom of the tree.
Thus, their children connections would be set to NULL.
This serves as simply a short summary of tree data structures as there exist a varied number of implementations of trees.
However, all trees follow this general structure.
Below is the implementation of a basic binary tree.
            #include stdio.h
            #include stdlib.h
            #include string.h

            /* A tree node. Holds pointers to left and right sub-trees, and some data (a string).
             */
            typedef struct node {
              struct node *left;
              struct node *right;
              char *string;
            } node;

              node *root; /* pointers automatically initialized to NULL */

            int insert(const char *string, node *root) {

              /* Add a string to the tree. Keeps in order, ignores dupes.
               */
              int num = strcmp(root->string, string);
              node *temp;

              for(;;) {
                if ( 0 == num)
                  /* duplicate string - ignore it. */
                  return 1;
                else if (-1 == num) {
                  /* create new node, insert as right sub-tree.
                   */
                  if ( NULL == root -> right ) {
                    temp = malloc(sizeof(node));
                    temp -> left = NULL;
                    temp -> right = NULL;
                    temp -> string = strdup(string);
                    return 2;
                  }
                  else
                    root = root -> right;
                  }
                else if ( NULL == root ->left ) {
                  /* create new node, insert as left sub-tree.
                   */
                  temp = malloc(sizeof(node));
                  temp -> left = NULL;
                  temp -> right = NULL;
                  temp -> string = strdup(string);
                  return 2;
                }
                else{
                  root = root -> left;
                }
              }


              void print(node *root) {
                  /* in-order traversal -- first process left sub-tree.
                   */
                  if ( root -> left != NULL ){
                      print(root->left);
                  }
                  /* then process current node.
                   */
                  fputs(root->string, stdout);

                  /* then process right sub-tree
                   */
                  if ( root->right != NULL ){
                      print(root->right);
                  }
              }

              int main() {

                  char line[100];

                  /* Let user enter some data. Enter an EOF (e.g., ctrl-D or F6) when done.
                   */
                  while ( fgets(line, 100, stdin)){
                      insert(line, root);
                  }

                  /* print out the data, in order
                   */
                  print(root);
                  return 0;
              }
The code for implementing a tree listed here contains a number of components.
First, we define a node type using a struct at the top of the code.
Next we have our main piece of functionality.
This is our insert function.
This function checks to see if a string being inserted into the tree already exists.
If it does, we ignore it.
This is a design choice. In some forms of trees, we could have duplicate values.
For the purposes of this example tree structure we do not allow for duplicates.
If the element we want to insert is not a duplicate, we then insert it either to the left or the right of the current node.
This allows us to balance the tree and make sure that it grows evenly.
This has just been a relatively quick introduction to trees.
Below are links to a variety of resources and videos for different styles of tree data structures.
Regular Trees:
Geeks for Geeks Introduction to Trees
W3Schools Trees
Red-Black Trees:
Brilliant.org red-black trees
Binary Search Trees:
Red-Black Trees:
B-Trees:
#include stdio.h
#include stdlib.h
#include string.h
/* A tree node. Holds pointers to left and right sub-trees, and some data (a string).
*/
typedef struct node {
struct node *left;
struct node *right;
char *string;
} node;
node *root; /* pointers automatically initialized to NULL */
int insert(const char *string, node *root) {
/* Add a string to the tree. Keeps in order, ignores dupes.
*/
int num = strcmp(root->string, string);
node *temp;
for(;;) {
if ( 0 == num)
/* duplicate string - ignore it. */
return 1;
else if (-1 == num) {
/* create new node, insert as right sub-tree.
*/
if ( NULL == root -> right ) {
temp = malloc(sizeof(node));
temp -> left = NULL;
temp -> right = NULL;
temp -> string = strdup(string);
return 2;
}
else
root = root -> right;
}
else if ( NULL == root ->left ) {
/* create new node, insert as left sub-tree.
*/
temp = malloc(sizeof(node));
temp -> left = NULL;
temp -> right = NULL;
temp -> string = strdup(string);
return 2;
}
else{
root = root -> left;
}
}
void print(node *root) {
/* in-order traversal -- first process left sub-tree.
*/
if ( root -> left != NULL ){
print(root->left);
}
/* then process current node.
*/
fputs(root->string, stdout);
/* then process right sub-tree
*/
if ( root->right != NULL ){
print(root->right);
}
}
int main() {
char line[100];
/* Let user enter some data. Enter an EOF (e.g., ctrl-D or F6) when done.
*/
while ( fgets(line, 100, stdin)){
insert(line, root);
}
/* print out the data, in order
*/
print(root);
return 0;
}